Full Back Ability

This article is adapted from the Athletic Truth Group. It has been tested by Dr Brian Lanoue and is approved as advice for our practice members to incorporate for lower back strengthening and rehab. All links to ATG programming are listed below in order to link to their services.
ATG: FULL Back Ability Zero Workout
The goal is to give you a full body Back Ability workout you can use for yourself or others, RIGHT NOW (and forever more), with ZERO gym equipment.
There are 2 optional warm-ups and 9 exercises.
I shot pictures of every exercise for you, and I made new form videos of each one for the app (access to app requires subscription to ATG coaching). Dr Brian Lanoue can advise on form and any restrictions during in-person appointments for any active practice member.
OPTIONAL BACK ABILITY ZERO WARM-UPS
PART A: Backward walking.
If we’re going to address the full body, we should still be getting some backward exercise in, not just for the knees but also for the feet and lower legs:
Backward walking happens to activate the spinal muscles more than forward walking!
At least 5 minutes will get some strength and circulation going.
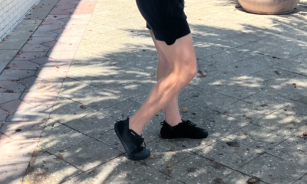
PART B: Tibialis raises.
Even one set of 25 reps can go a long way for long-term foot, ankle, shin, and knee health.
Standing closer makes it easier, and lifting one foot at a time makes it even easier:
Now that we’re aware of that investment into our feet, lower legs and knees, we can get into…
THE 9 STEPS OF BACK ABILITY ZERO
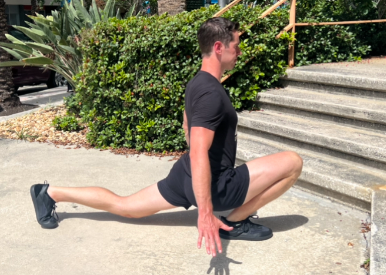
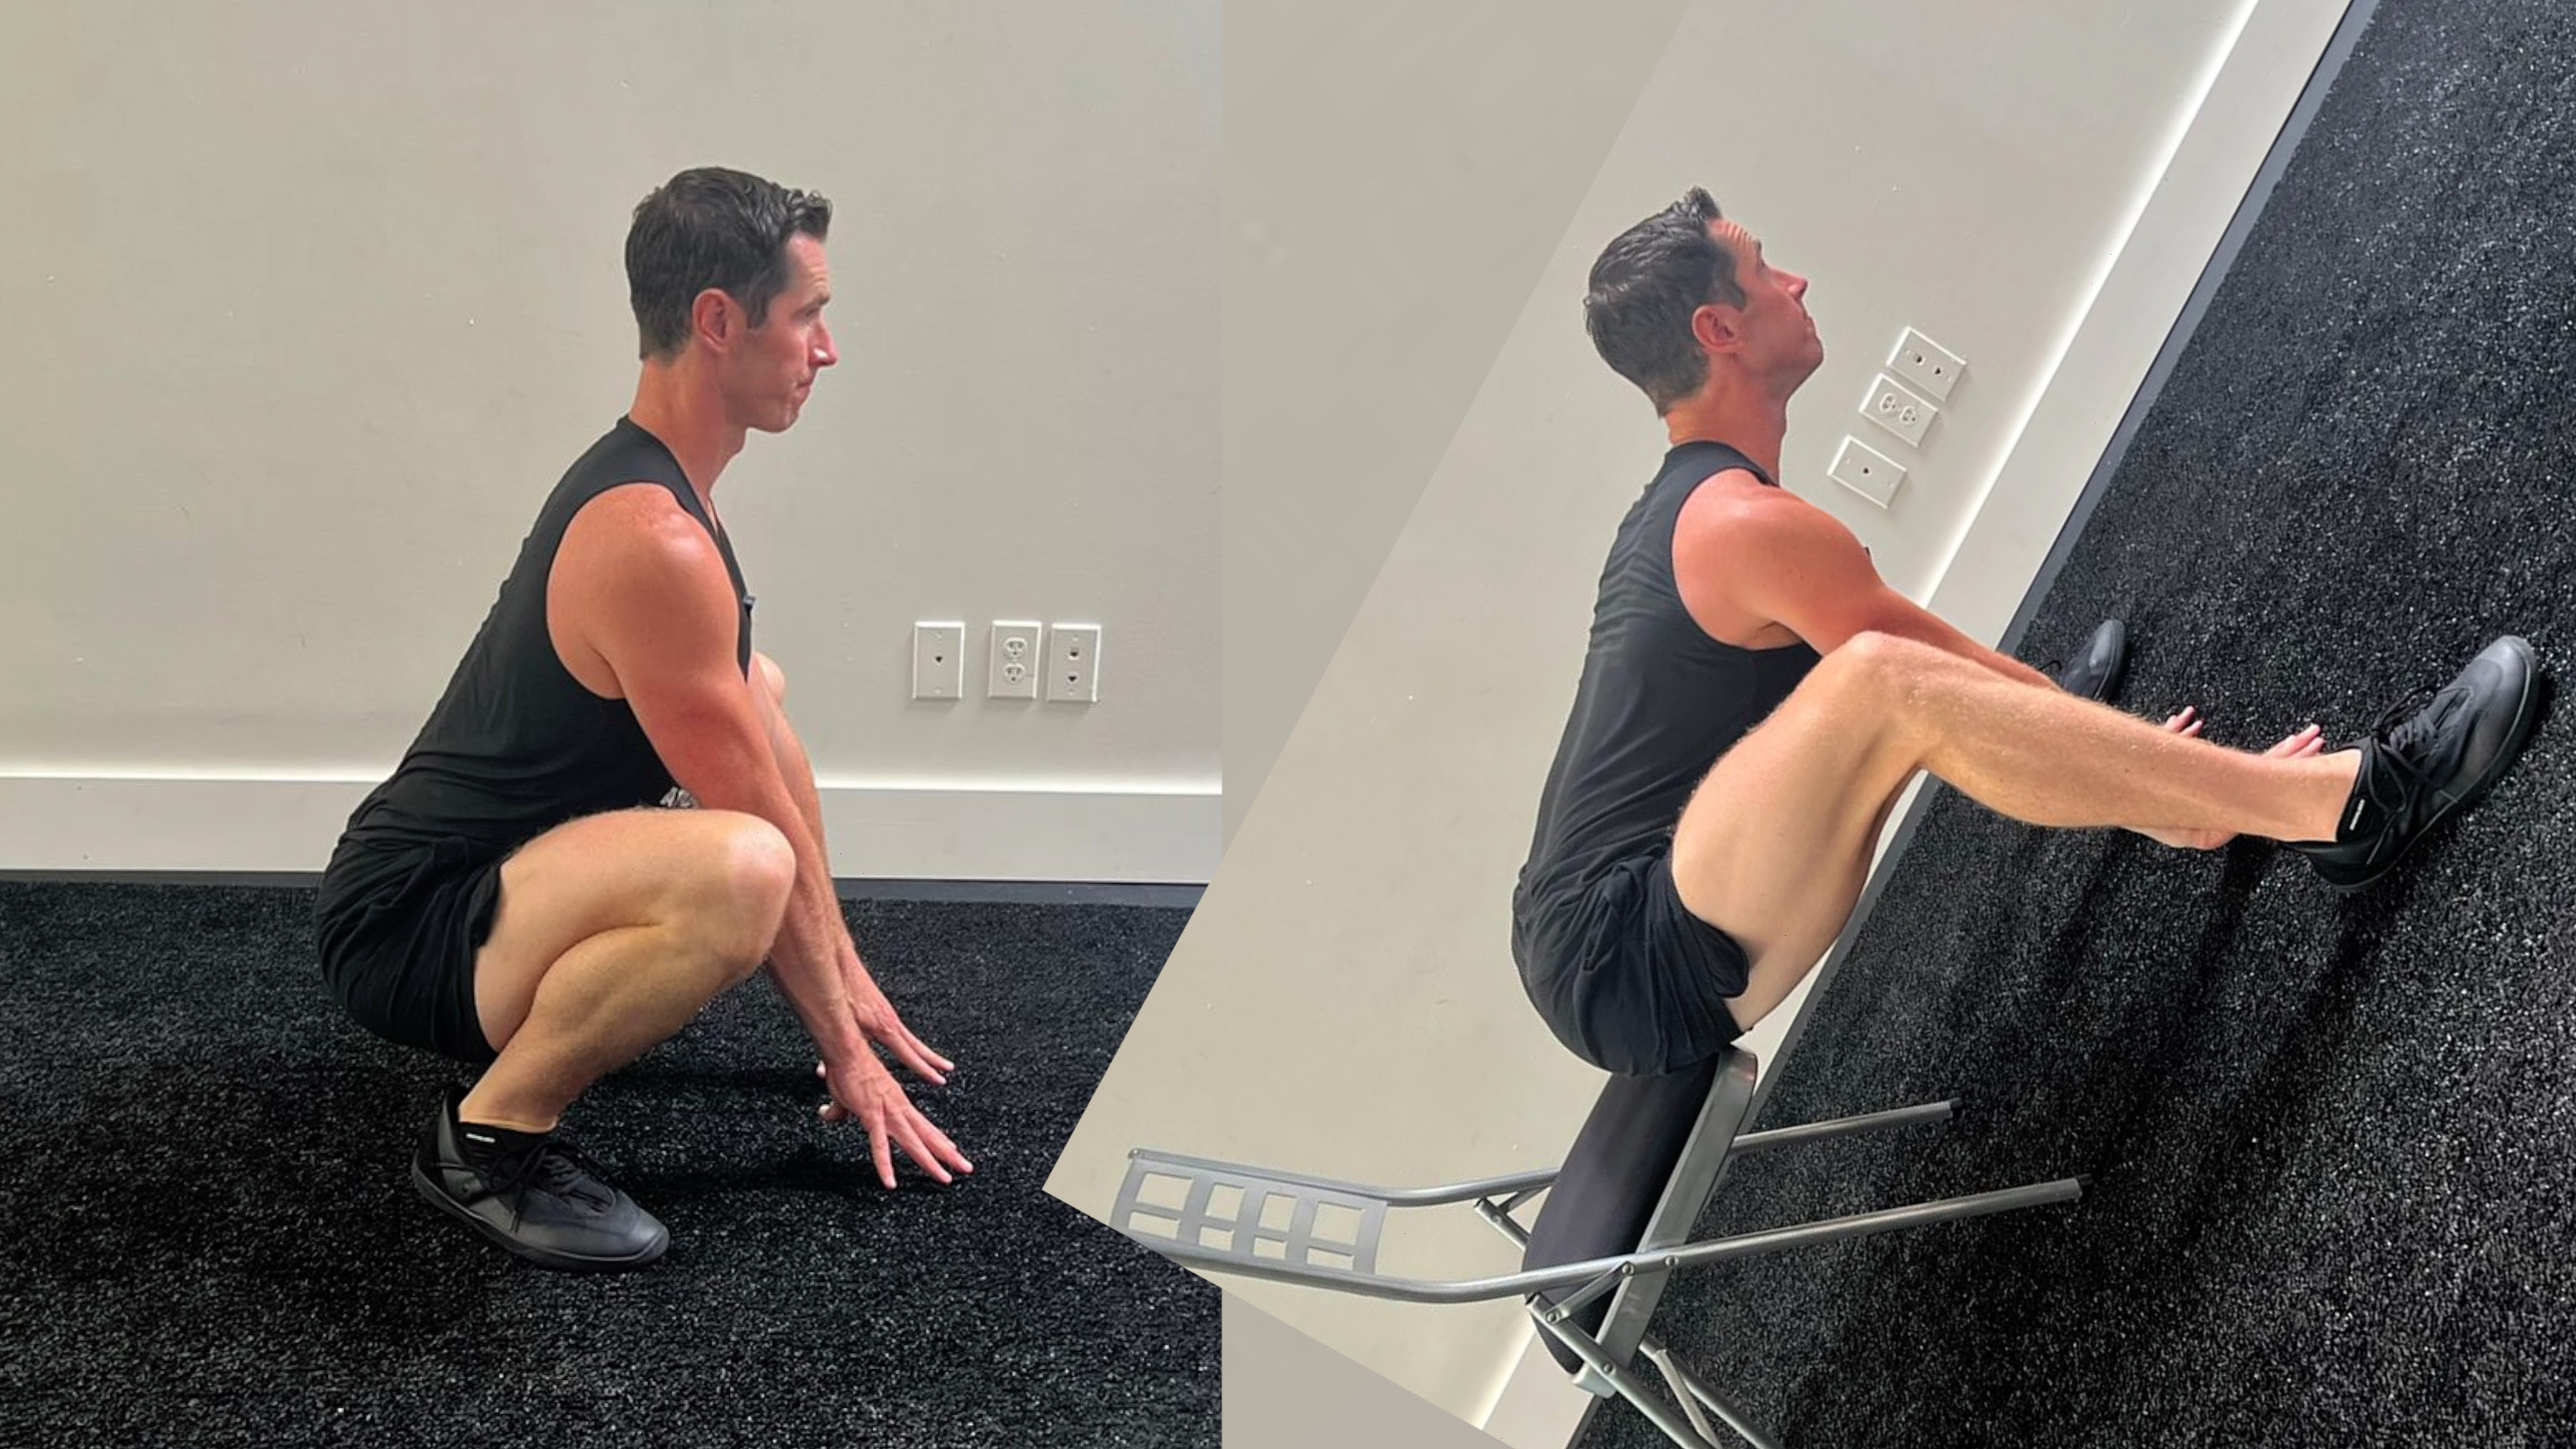
STEP 1: ATG SPLIT SQUAT STRETCH, 30 seconds per side
A stairwell is a perfect regression system.Elevating the front foot makes the mobility easier:
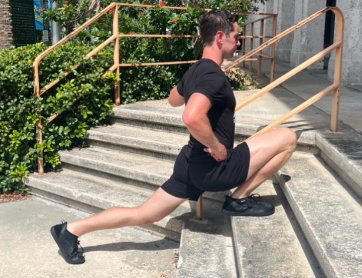
And assistance from the railing makes the strength easier:
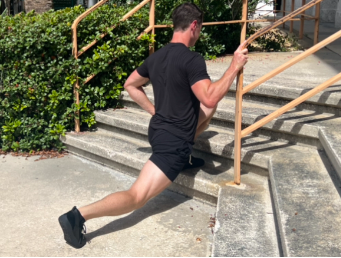
A chair can also work, and then you could find a lower surface to progress further:

By OWNING the bottom position for 30 seconds per side, you can create significant changes in the strength AND LENGTH of your hip flexors, a series of 5 muscles which start from your lower spine and connect to your thigh. They’re likely tight in just about all modern humans!
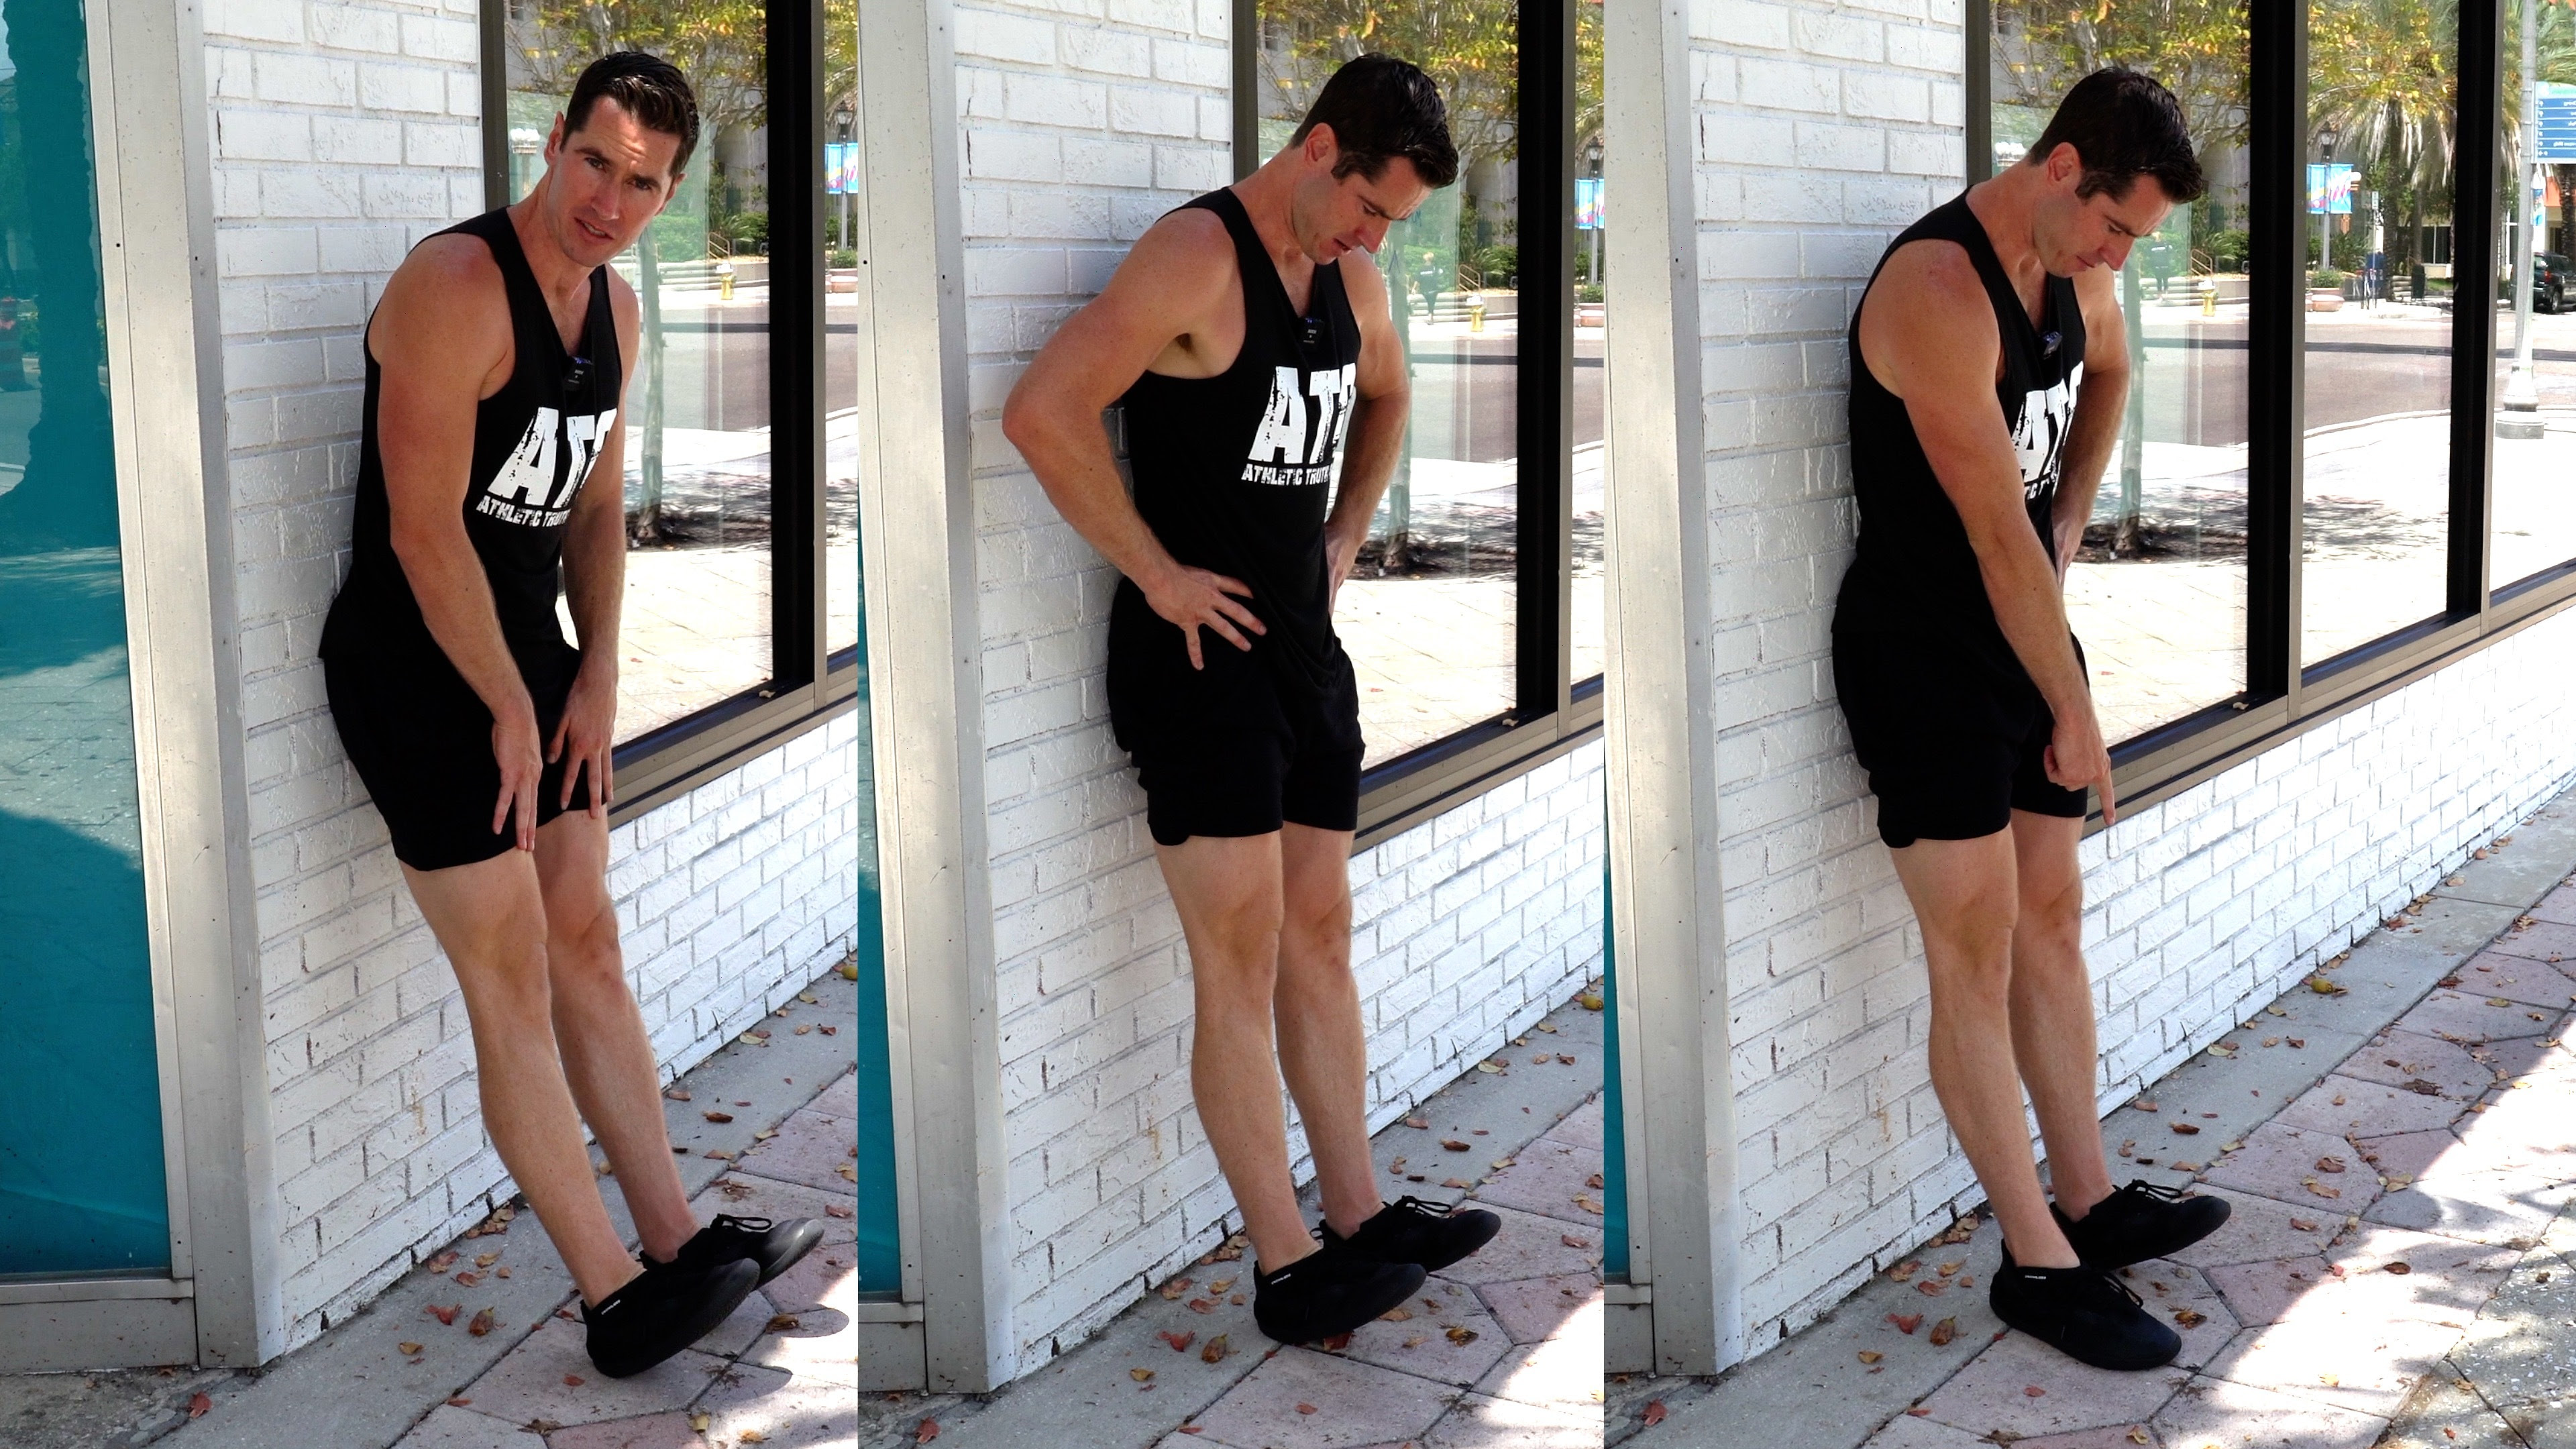
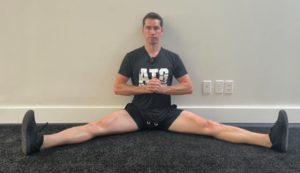
STEP 2: SEATED GOODMORNING, 15 reps
A chair is perfect. Get the best posture you can, open your legs wide enough for your torso to sink between them, and get your feet in front of your knees.
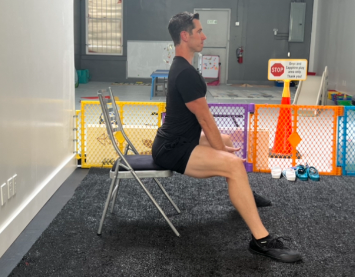
Now reach forward as low as you can without rounding your lower back. Your goal is to feel a stretch in your adductors, which are your biggest inner thigh muscles.

In cultures that stop deep squatting, the inner thighs and hips stiffen up. The seated goodmorning, done with intent on the stretched position, works the hips’ portion of squat mobility:
This is a LONG-TERM “strength-through-length” exercise. There is no rush at this stage. We’re just trying to get into motion in this range and begin the mobility transformation.
The ATG Split Squat plus seated goodmorning have been my most consistently workable foundation for mobility. If I could teach only those two steps, I would still be very grateful for my job.
However, there are a lot more areas that connect to the lower back, so let’s keep MOVING…
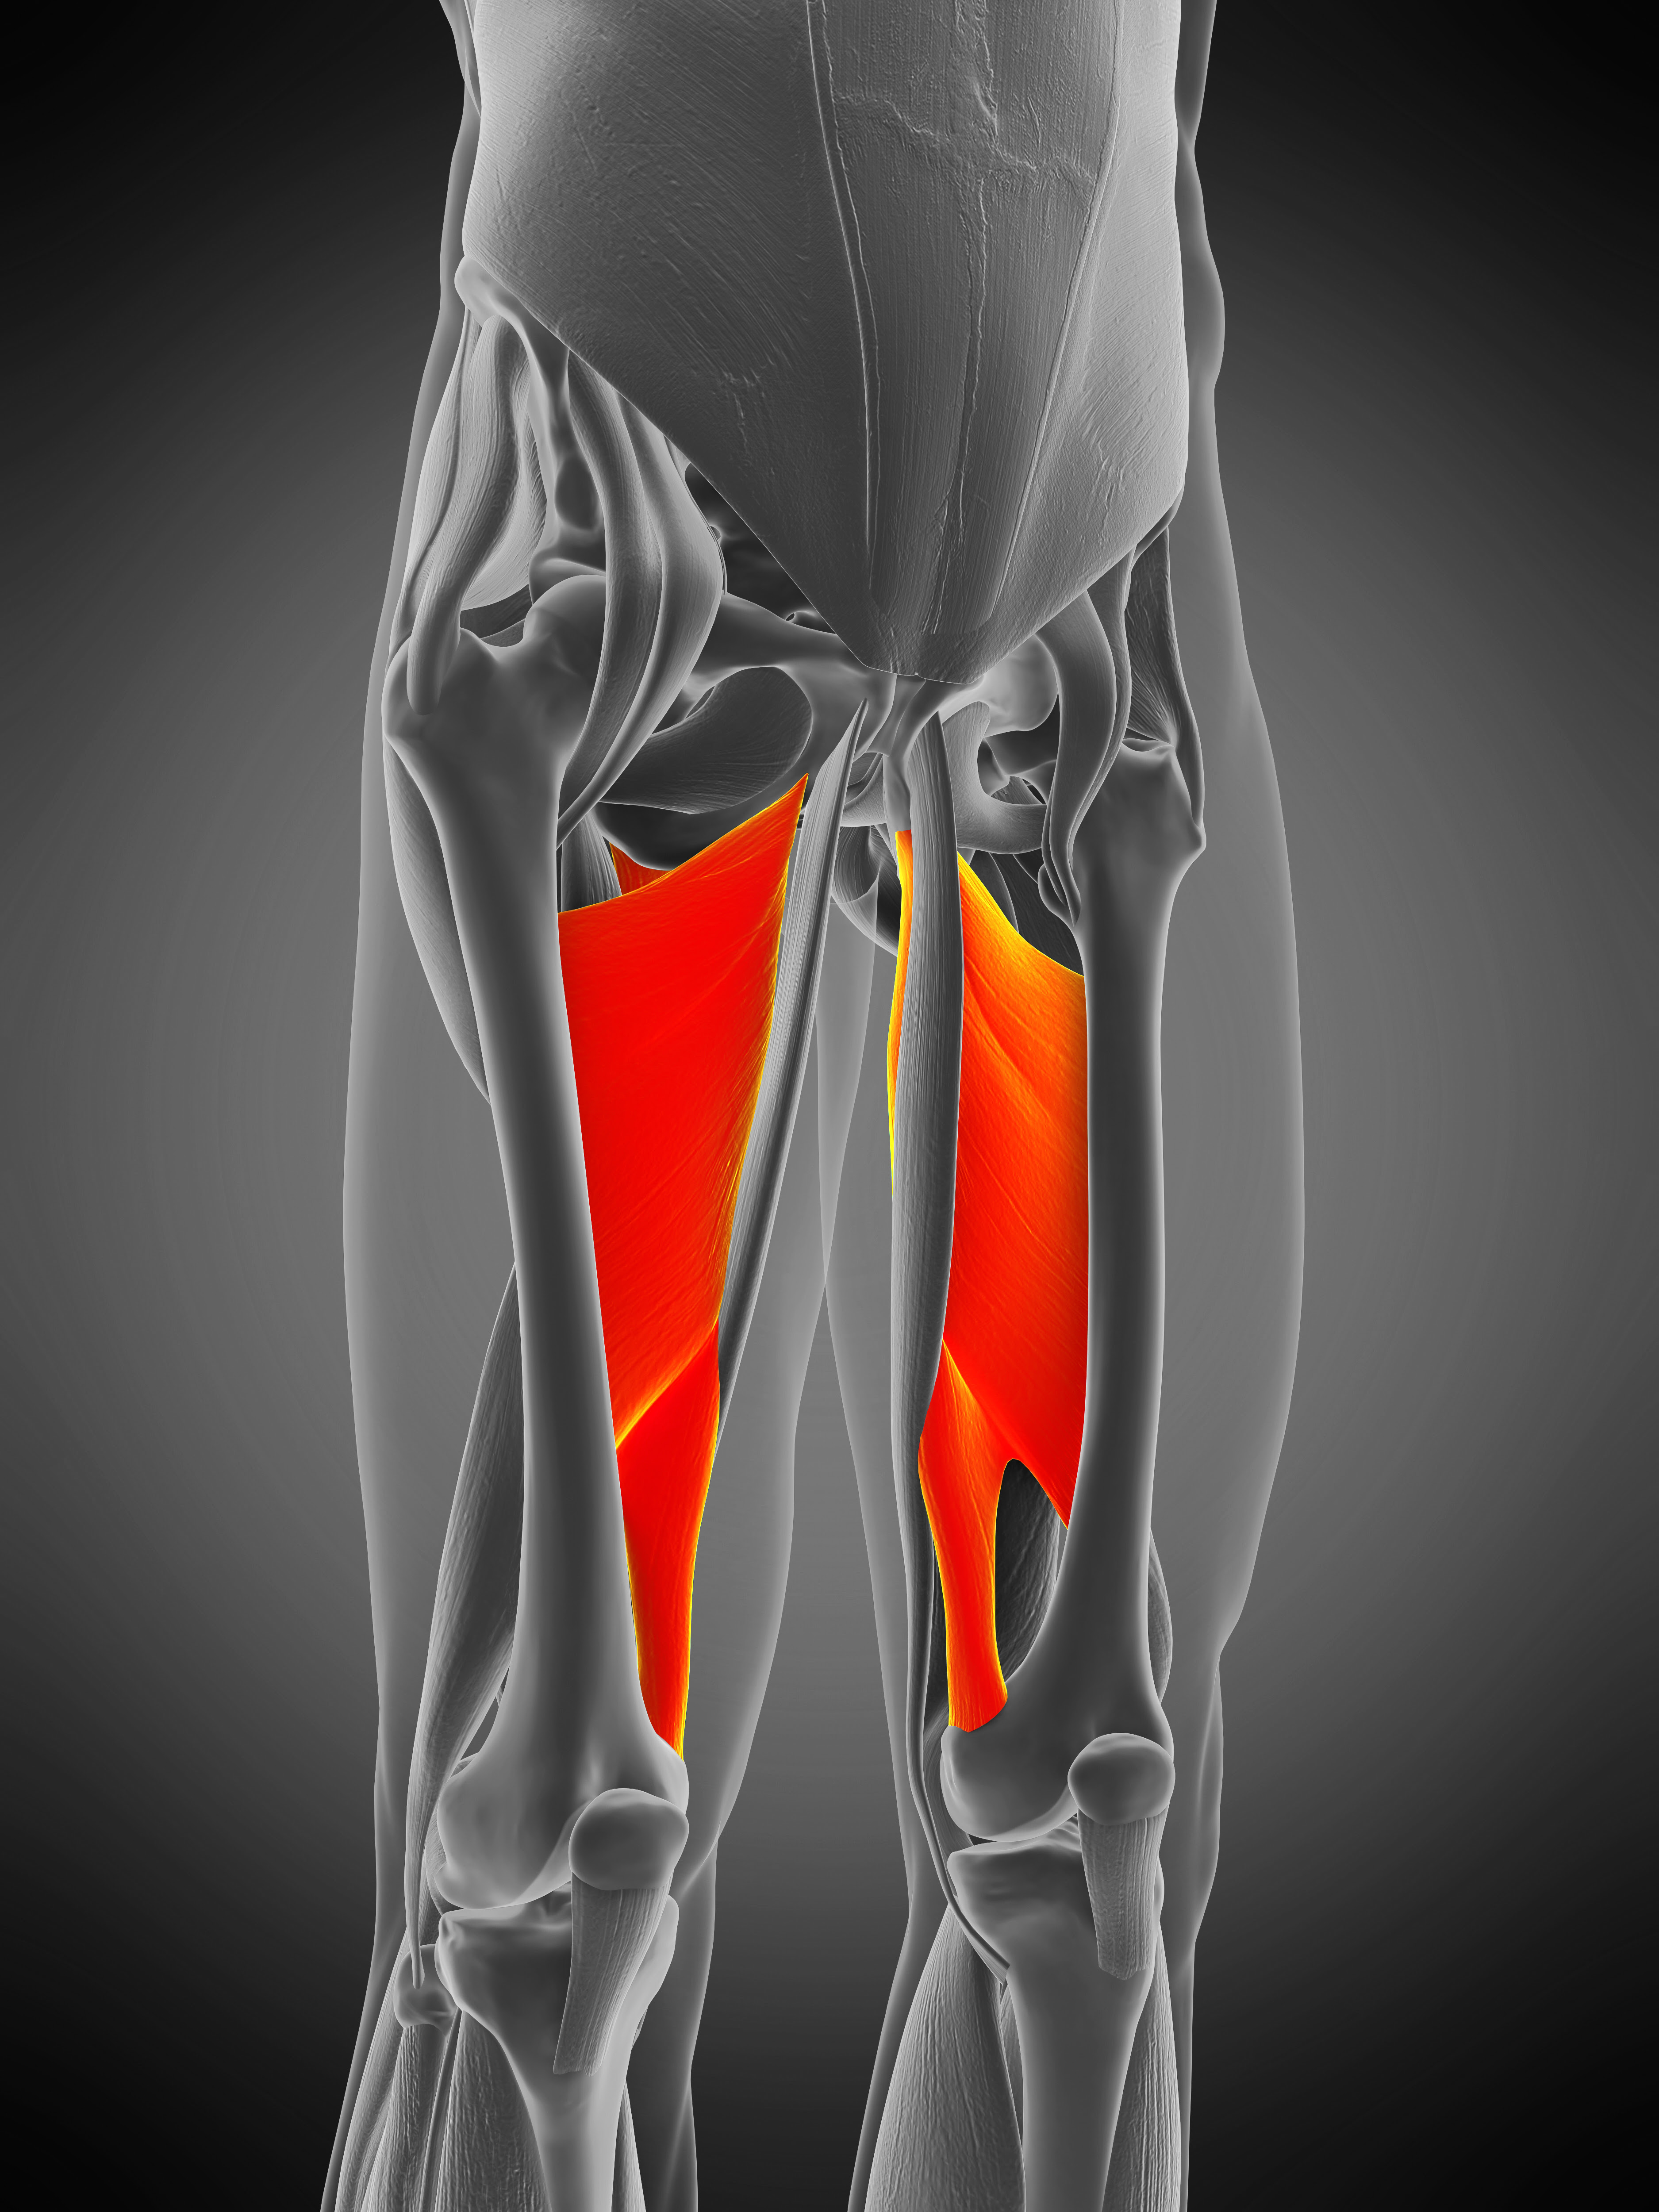
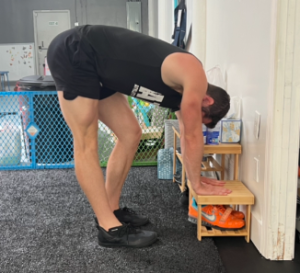
STEP 3: PIRIFORMIS PUSH-UP, 15 reps per side
The piriformis (from Latin, “pear-shaped”) gets in the way of a nerve that goes from your back down to your legs, so opening it up often causes an “instant miracle” effect for the lower back:

We just want to achieve above the norm strength-through-length, which you may be noticing is our biggest keyword for lower back protection. Any area which connects to your lower back and ends up tight or weak makes your lower back vulnerable! And this is why the lower back is so “mysterious.” It’s NOT mysterious if you understand all the muscles that connect to it, and have solutions to make them both flexible and strong.
Getting in position with the legs around a 90-degree angle, with hands on floor, allows you to “push-up” into and out of a stretch for the piriformis:

Your goal over time is to reduce the assistance your hands provide!

But there is no rush on this step – or any step.
Your INTENTION is to get your body into positions of MOBILITY and then GRADUALLY load the position, with the goal of greater strength and flexibility than when you started.
Over the course of a workout, a week, a month, a year, you can absolutely TRANSFORM the protection of your lower back.
Now, you may notice that Steps 1 through 3 address commonly stiff areas BELOW the lower back, which then affect the lower back’s ability to function normally.
When I consider Back Ability, I think about those 3 steps as “BELOW the Lower Back.”
The next 3 steps I think about as “AROUND The Lower Back.”
In Zero, we’re flowing right on through. We never have to stop moving!
But it still helps me to think about these as sections, so it may help your understanding, too…
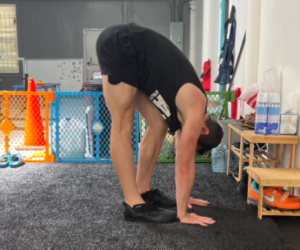
STEP 4: PIKE PROGRESSION, 15 reps per side
Now we’re seeking the GENTLEST way to address the lower back’s ability to BE in a rounded position. Steps 1-3 are all about PREVENTING stress on the lower back. Step 4 is now about being able to TOLERATE that stress.
This exercise improves both the strength and flexibility needed to be in a rounded position. Higher support for the hands makes it easier. You straighten one leg at a time, 15 times per side:

When that’s easy, go lower:
The goal of Back Ability is palms to floor:
It’s quite remarkable how much progress you can make with just your BODY in the exercises we’ve covered so far.
The next steps help stabilize those gains…
STEP 5: SEATED HIP FLEXOR STRENGTH, 15 reps per side
This strengthens the exact opposing muscles of the previous exercise! A body with ability on each side is more bulletproof than one which is weak on either side.
Sit on the floor, with legs straight. Feel your hip flexor work to lift your leg. Hold 2 seconds. Lower. Repeat with the other leg. Perform 15 reps per side.
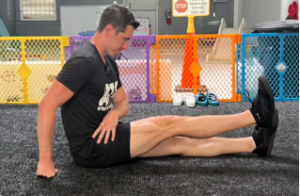
Reaching farther makes it tougher!

Leaning back makes it easier:

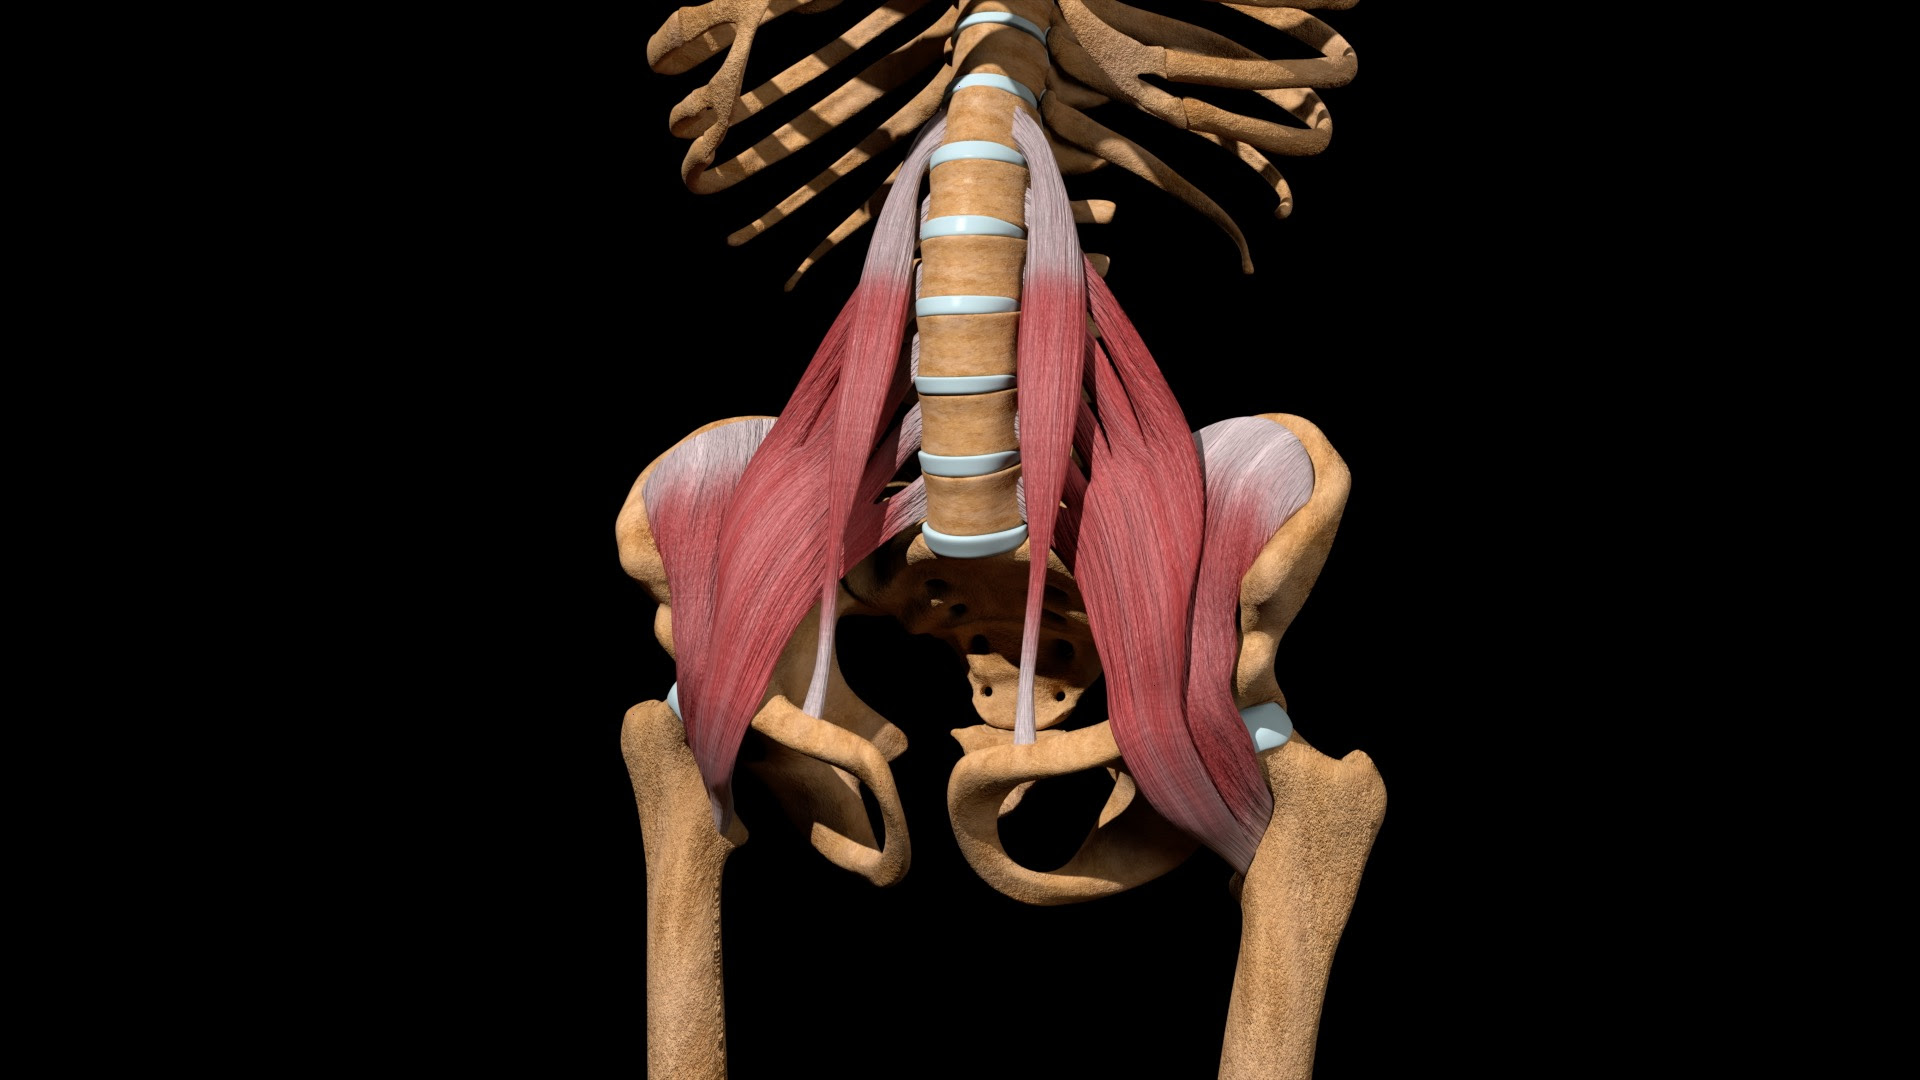
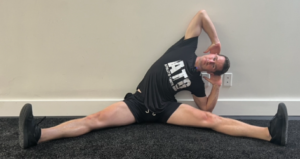
STEP 6: QL, 15 reps per side
QL is short for quadratus lumborum. Think “quad” because of its four sections. Look closely at the picture below and you’ll see how each one attaches into the lower spine! “Lumborum” means “of the lumbar spine.” “Lumbar” is the technical name of your lower spine.

When interviewing people with back injuries, it quickly becomes apparent that many of them happen with LATERAL forces, not just straight forward and backward pressures. You bend down to pick something up which isn’t directly in front of you and… BOOM! Now you’re relying on your QL muscle!
The QL is rarely ever trained with strength-through-length, so start slow because it can make you quite sore. Many people who’ve been exercising for decades have never trained this muscle, so it’s like being a newbie all over again. But I think of it like this: new muscle, new potential!
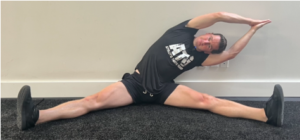
Sitting with your back against a wall and legs spread apart for stability, stretch your body to one side until you feel the QL stretch. Go back and forth 15 times per side. The leverage of your arms makes the exercise easier or harder.

Tougher:
Even tougher:
Think how many areas of protection we have covered so far for our lower back. It’s already quite an effective system, BUT there’s one more zone to make it complete…
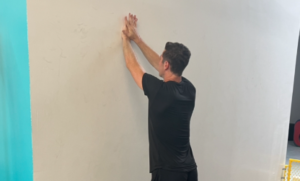
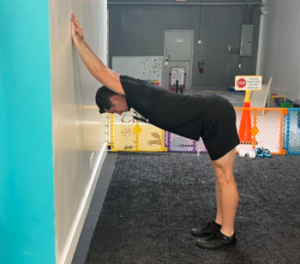
STEP 7: PULLOVER, 15 reps
Now we address your strength and mobility ABOVE your lower back.
A wall is all you need for this step. With hands together and overhead, walk your feet back until you feel a gentle stretch through your upper body. From this position, use your strength to push OUT. And repeat. 15 reps opens up your posture against the modern hunch while making you stronger in that position.

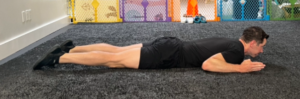
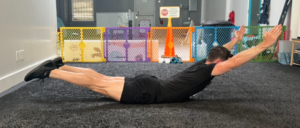
STEP 8: TRAP-3 RAISE, 15 reps
Your “trap-3” is your third and lowest row of trap muscles (think trapezoid due to their shape). This third row is JUST ABOVE your lower back. It’s CHRONICALLY WEAK in modern society, likely due to stiffening up in the opposite direction, so these muscles rarely get to flex.

The easiest way to start this is face down on the floor. With arms bent, raise your shoulders and legs off the ground. Then extend your arms overhead. Then slowly lower down. Do this 15 times, at your own pace. You can take breaks as needed.


Then there’s one thing that finishes off the formula perfectly…
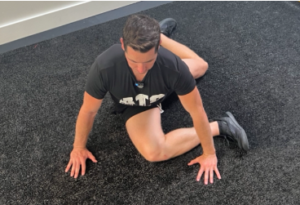
STEP 9: COUCH STRENGTH, 30 seconds per side
Theoretically, you do not need the couch stretch since the ATG Split Squat already stretched your hip flexors. But due to the modern lifestyle of excessive sitting – which begins in school at FAR too early an age – I’ve seen best results by doubling up on hip flexor length. You’ll notice that the ATG Split Squat was the first step, and this is the final step. That’s intentional.
The ATG Split Squat PLUS the couch stretch have been an exponentially effective one-two punch compared to only one or the other.
You may think “couch strength” was a typo, but it’s not. By naming it couch “strength” I’m indicating that your goal is to actively be strong in this position:

Notice how I took one couch cushion and placed it on the floor next to a section of the couch which also has a cushion. This makes it comfortable on both the knee and the ankle, which are two common barriers to results with the couch stretch.
Once comfortable in the position, gradually apply force into the couch. The simple action of actively being strong through this stretch significantly increases chances of long-term success.
When you add this stretch to the rest of the program, you have truly approximated the opposite of SITTING, so FEEL FREE to do your Back Ability Zero flow before or after a long day of sitting.
And if you have the freedom, you could even space your exercises out over the course of your workday. THIS IS EXACTLY HOW MY MOM DOES HER WORKOUT. She runs ATG customer service from her home office, and she spaces out her Back Ability Zero program throughout her day. In the AM she begins with backward walking outside, and in the PM caps things off with the couch stretch.
One time through these 9 steps is a WIN, and I’m OK with you doing a second time through.
Let’s recap!
Back Ability Zero
Optional Warm-Up: 5 mins Backward + 25 Tibs
-
ATG Split Squat x 30 seconds per side
-
Seated GM x 15 reps
-
Piriformis Push-up x 15 reps per side
-
Pike Progression x 15 reps per side
-
Seated Hip Flexor Strength x 15 reps per side
-
QL x 15 reps per side
-
Wall Pullover x 15 reps
-
Floor Trap-3 Raise x 15 reps
-
Couch Stretch x 30 seconds per side
1-2 rounds of the 9 exercises
Visual Recap:
1. ATG Split Squat: 30 seconds per side

2. Seated Goodmorning: 15 reps

3. Piriformis Push-up: 15 reps per side
4. Pike Progression: 15 reps per side
5. Seated Hip Flexor: 15 reps per side
6. QL: 15 reps per side
7. Pullover: 15 reps
8. Trap-3 Raise: 15 reps
9. Couch Stretch: 30 seconds per side
If you’d like personal guidance with mastering this routine, it’s on the app as a Monday-Wednesday-Friday formula. While you could do it daily, I generally like every other day. Once you have a routine that WORKS, there’s no need to overdo it. Focus, execute, recover, and enjoy the gains!
Thank you for reading.
Yours in Solutions,
Ben
Thank you for your support of ATG Online.
Special thanks to those of you now doing our coaching certification so you can help others.
And thank you for supporting ATG Equipment, as well as our barefoot-inspired sneaker.